Back Exercises: The Best Exercises You Can Do To Strengthen Your Back And Relieve Pain

Having a Strong Back Bone
Back exercises are a key to maintaining a strong core and reducing the incidents of pain or back trouble. The muscles that surround and stabilize the spine are of vital importance to everything else you do in life. As always, since we live in a litigious society, it must be stated that with all exercising comes the risk of injury. Consult your doctor or physiologist before starting a new program. With that said, besides the fact that the following exercises are widely considered the best by the experts, they have eliminated a long history of back trouble in me. Hence, I highly recommend them.
Since many of the exercises below are derived from yoga poses essentially, you might become interested in taking a yoga class, because yoga is an outstanding way to strengthen your back, core, and align your spine correctly. The ancient practice offers many other benefits that fall into the physical, mental, and spiritual realm. This Roundup on Different and Invaluable Yoga Disciplines describes the many advantages of practicing any of the three different yoga disciplines detailed in the series.
The Hip Bridge
For all of these exercises, it’s a good idea to warm up by lying on your back and hugging your knees to your chest for a good stretch first. Then, alternate extending one leg and hugging the other knee to the chest. Healthy hamstrings are also integral to a strong back. Whenever the hammies get really tight, back trouble will soon follow; so stretch the legs thoroughly too.
The Hip Bridge is a great back exercise designed to offset all of the misaligning forces that work to give a person back pain. Age, gravity, and way too much time spent in a chair all take a toll on the back and therefore it’s imperative to engage in specific exercise that counteract all that pressure on your spine.
To form the Hip Bridge, lie down on a soft surface like a rug or yoga mat. Bend your knees and have your feet flat on the ground, hip-distance apart. Your arms should be fully extended toward your feet with the palms on the floor. This is the starting position. From here, squeeze your buttocks muscles and raise those hips gently until there is a straight line from your knees down to the tips of your shoulders. Hold for a count of three, or three steady even breaths, and then slowly lower back down to the
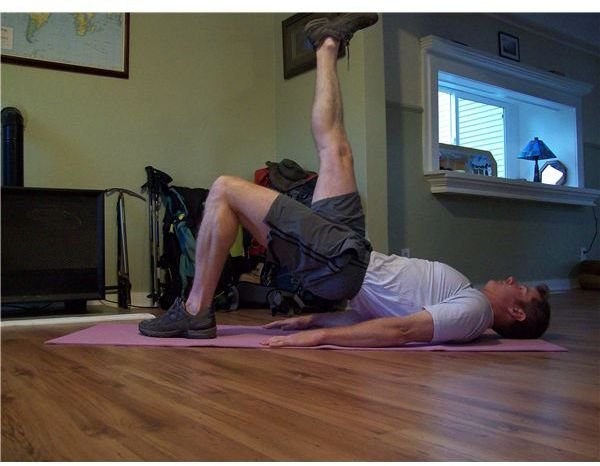
starting position. You’re looking initially for 10 to 12 repetitions.
This movement stretches your hip flexors and makes the muscles that stabilize the spine stronger, which include the gluteals, the lower back, and the abdominals. A more advanced version involves lifting one foot off the floor and as straight as you can make it toward the ceiling. Keep your hips even as you do it, that’s really important. If you’re up to it when you strike this pose, do 5 to 10 reps on each leg.
The Bird Dog

Another modified yoga position known as the Bird Dog (you can anticipate that pointing is involved) has you on

your hands and knees. Knees are hip-width apart and directly below the hips, and hands are shoulder length apart and directly below the shoulders. Engage the abs by pulling your belly slowly toward the spine. Don’t arch your back and concentrate on keeping your spine neutral as you extend your right leg back and your left arm forward. Extend and reach those toes and fingers away from your body. Don’t rotate the hips, but rather keep them level. This balancing strengthens those back stabilizing muscles of yours to better perform every movement you have to make in life. Hold the position anywhere from 2 seconds to thirty seconds depending upon how you feel and your fitness level. Do each side 5 -10 times.
The “I’m Not Sure What It’s Called, But It Works Wonders For Me Exercise”
Lie on your back, legs fully extended, and put a slipper or shoe under one but cheek. Lift the foot and knee of the leg that doesn’t have the slipper under it, to above and to the outside of the other knee. Slowly brush that foot down the outside of the extended leg, then bring that foot back across the extended leg and out to the side 30 or 40 degrees. Then bend the knee again and repeat the whole process. It should be one fluid motion that you repeat 10 or 15 times for each side. Trust me, the name isn’t so important, but the fact that I have a history of lower back problems and this exercise greatly helps when I’m having an episode of pain, is. Donna Clark lists some more excellent options for you in Stretching Exercises for the Back that will bring you relief from back pain.
Plank Series

Several versions of the Plank pose build a strong core, which includes your abs,
obliques, and lower back

muscles. Having strong abs is a key to having a strong back. For the standard Plank, lie down on your mat facing the floor and while remaining on your elbows (or hands), raise your body to a push-up position. Keep your abs engaged and maintain a straight-as-a-plank position from your head to your toes. Hold it for anywhere from 15 to 60 seconds depending upon how strong you are already. 3 sets will suffice.
The Reverse Plank has you striking that same pose except this time, you’re facing

the ceiling. Again 15 to 60 seconds for 3 reps. The Side Plank has you on your side either on your elbow or hand (either way, your elbow is directly below your shoulder). Lift your hips to create that same plank look with your neck in perfect alignment, with your spine and your hips square while you’re facing a wall. Same count, same reps.
Consistently practicing these exercises and gradually making them more challenging by increasing the time you spend in a pose will surely strengthen your back. With some of them, you will feel immediate relief from tight lower back muscles. The stronger and more stretched you make these muscles, the less chance you’ll get injured.
Sources:
The Holistic Care: https://yoga.theholisticcare.com/
Bigbackpain.com
Northern Lights Yoga, Helena, Montana