For someone suffering from rheumatoid arthritis, a hip joint replacement gives them almost immediate relief from pain. The next six weeks are equally important when a number of measures must be taken to ensure a complete success; the most important one being the avoidance of crossing one’s legs.
Introduction to The Treatment of Rheumatoid Arthritis - A Replacement Hip Joint.
When one has endured the pain of a hip joint subjected to the ravages of rheumatoid arthritis, it is an unbelievable relief from that pain to have it replaced.
This is quite a major operation and there will still be post operative pain. However, with care and observance of some fundamental guidelines until one sees the orthopedic surgeon again, this gradually diminishes.
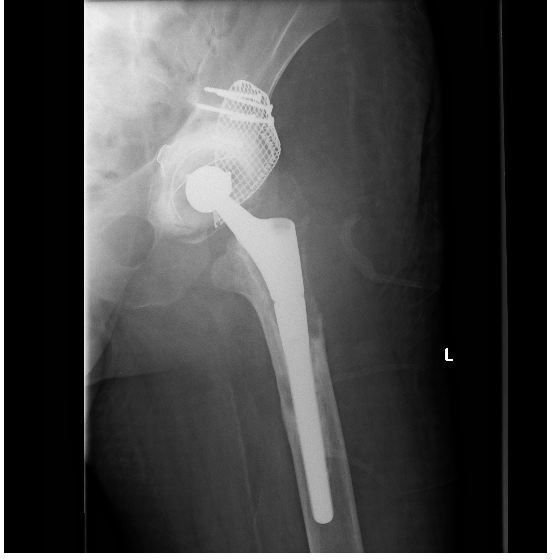
I had both hip joints replaced in the last year, with my left one being a revision – replacing a replacement hip joint - I have included my x-rays in the image section to show the difference.
Here we discuss the treatment of rheumatoid arthritis and, in particular, a replacement hip joint.
The article begins with an overview of a normal hip joint replacement, and goes on to look at the measures to be taken once the hip has been replaced.
Overview of a Replacement Hip Joint.
The hip joint is one of the major weight bearing joints; when it is attacked by rheumatoid arthritis, it leaves one in excruciating and debilitating pain.
It is essential, however, to endeavor to maintain mobility in the joint, right up to the point of surgery, as this will make post operative exercises and recovery somewhat easier.
The operation involves removing the worn ball and socket that makes up the hip joint, and replacing them with a steel ball and plastic socket.
This entails splitting the ball from the socket and cutting off the old ball from the femur right back to good sound bone. A hole is then drilled down the centre of the femur and a metal stem with the new ball inserted and cemented into the hole.
The old socket is then removed and the new ‘plastic’ poly techno fluoride (PTFE) socket cemented into place.
The femur is now manipulated to allow the ball to be fitted into the new socket, and the area stitched up. The patient is removed from the operating theater to the recovery area and remains under observation until recovered sufficiently to be transferred back to the ward.
Once back at the ward, a wedge is placed between the knees to prevent the patient crossing their legs, and sometimes special socks are utilized to encourage circulation and prevent the formation of blood clots. These stockings stay on for a few days until the patient is mobilized by the physiotherapist, who explains the exercises required to strengthen the hip muscles and avoid dislocating the new hip.
Normally, a patient is mobilized by taking a few steps with the aid of a walking frame twenty-four hours post operation.
Reference Web: nuffieldhealth - replacing a hip joint information
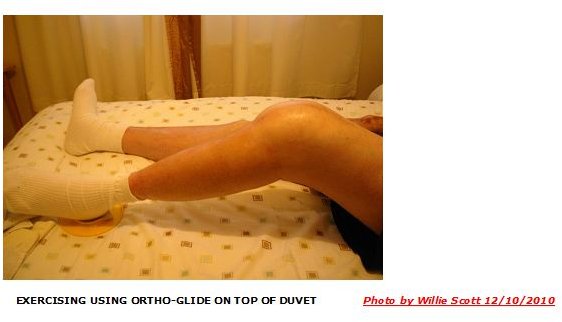
Exercises Following a Hip Repalcement
Exercise plays a vital role in a replacement hip joint. The physiotherapist will guide the patient through these, but there are basic exercises that the patient can do at home.
These are carried out lying on one’s back on a bed.
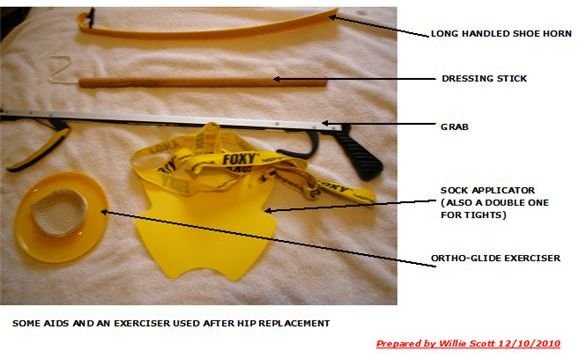
- Using a sliding board or an Ortho-Glide , bend the knee which will move the leg backwards and forwards. Now turn the board or use the Ortho-Glide, and move the leg sideways, towards the end of the bed and then back towards the centre. Repeat these exercises in batches of ten, three times a day.
- Using a raise under the knee, straighten the knee. This will lift the heel off the bed, where it is held for a count of three then repeated five times.
Author’s Experience of Hip Replacement
In my case, the old replacement titanium stem had become unglued and actually broken through the bone; the socket had broken away from the pelvis and dropped two inches.
The surgeon removed the old stem and re-drilled a new hole, and then reamed this to match the new titanium stem profile, which was serrated along its length.
This was driven home, but without glue, as the bone would grow into the serrations, making a more secure joint.
The old socket was removed and the worn pelvis packed with bone graft and mesh, and then stainless steel pegs pinned the mesh to the pelvis. The new socket was glued and fitted into the pelvis, and then the ball joint fitted to the socket.
I have to be very careful over the next few months to exercise regularly to get the muscles built up around the hip, and will be practicing what I preach, regarding my advice in this article!
Please read on to see what measures and precautions should be taken following a hip replacement operation.
Measures and Precautions to be Taken Following a Replacement Hip Operation.
The following measures and precautions should be taken for at least six weeks or until one sees the surgeon for post operative checks.
1. Bed
- Lying in Bed
The patient is encouraged to lie on their back and not on their operated or non-operated side. This is uncomfortable but is essential to avoid the risk of dislocating the new joint.
- Getting in and out of the Bed
When getting in and out of bed, the patient is advised to ‘lead’ with the operated leg, by shuffling across the bed with the operated leg, followed by the buttocks, and then by the other leg. It is also advisable, although not essential, to have someone lift both legs together off and onto the bed.
- Height of Bed.
Ideally, one should be able to sit on the side of the bed with both feet flat on the floor. If the bed is too low, the occupational therapist (OT) will arrange a temporary measure.
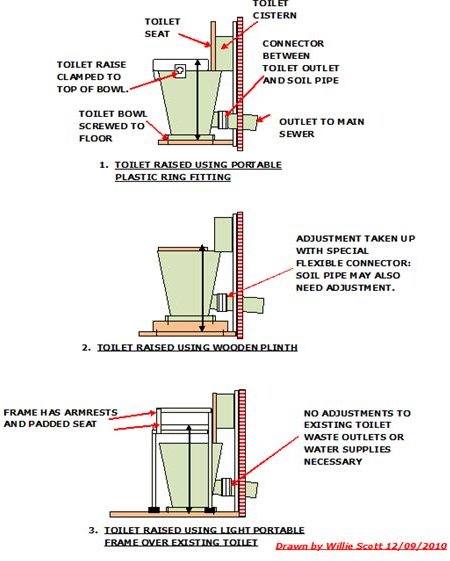
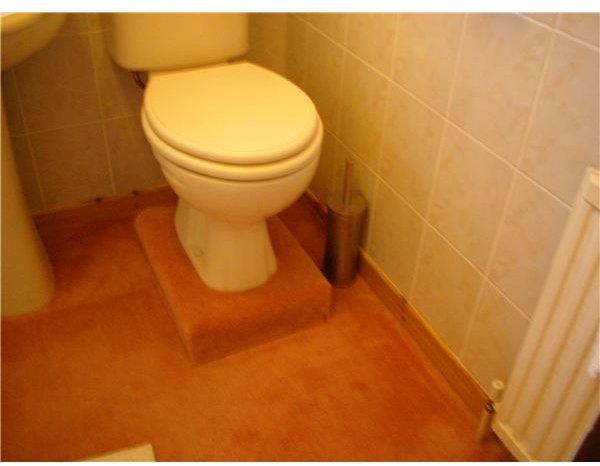
2. Toilet.
- Getting on and off the Toilet.
The normal toilet is too low for the patient to use following major hip surgery so a raise must be fitted. The usual type of raise is in the form of a plastic round doughnut, which is usually about four inches high.
Once the toilet seat has been lifted, the extension is easily fitted and clamped onto the top of the bowl. This is a temporary measure, but can be used as long as required and can be removed for cleaning.
3. Washing
- Bath
A good hot bath is something all patients look forward to, but it is better not to sit on the bottom of a bathtub, as it will be difficult to get back up again. A wash at the sink can suffice, or a bath board and stool can be used in the bath along with a non-slip bathmat in the interim, until the muscles have been built up sufficiently to enable the patient to get safely in and out of the bath.
- Shower
An over-bath shower should not be used but a shower cabinet is ideal, using a good quality non-slip bath mat, hand grabs, and a shower stool.
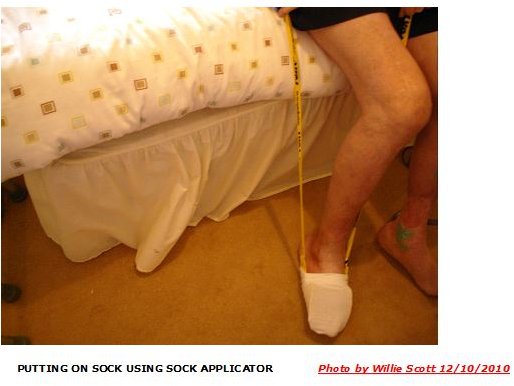
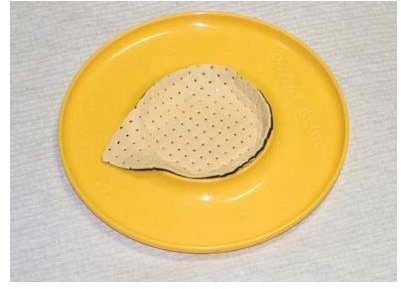
4. Dressing.
Dressing should be carried out while sitting comfortably on a firm chair with both feet on the ground. Use the dressing aids supplied by the hospital. These usually consist of a long handled shoehorn, a dressing stick, a hand grab, and a socks/tights applicator aid.
5. Sitting on a Chair
- The Chair
The chair should be firm but comfortable, with armrests for support, and be high enough for the feet to be on the floor and encourage an upright sitting position.
- To rise and sit
When getting out of a chair, it is important that the operated leg should be slightly in front of the other leg. Similarly, when getting into the chair, the operated leg should be slightly ahead of the other one, and the patient should use the armrests to lower themselves into and out of the chair.
6. Picking Something up of the Floor
This is one of the most dangerous tasks the patient has to perform relative to potentially dislocating the new joint, and it is imperative that the patient does not bend from the hips to reach the floor.
A grab stick should always be used to pick something up off the floor. The newer types have an attachment that allows the grab stick to be clipped to a walking aid.
7. Driving.
- Restrictions
In the UK, one is not allowed to drive for six to eight weeks after a hip replacement, and usually can only resume driving after being released by the surgeon at the post operation clinic.
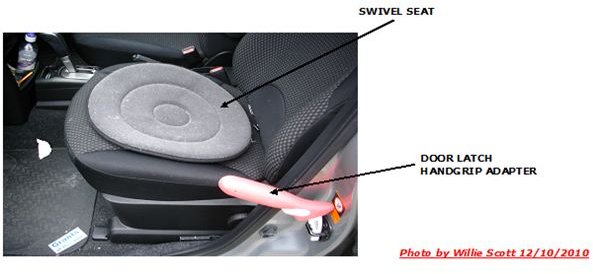
- Getting in and out of the passenger seat.
Always use the front passenger seat; getting in and out is easier from the road level, rather than from the pavement height.
Adjust the position of the passenger seat as far back as possible. Step backwards, using the walking aid, until the back of the legs touch the bottom door frame. Lower yourself onto the passenger seat, pushing your buttocks along as far as the hand brake. Have someone swing the legs together into the car, and then put the seat belt on before closing the door.
Getting out is the reverse of getting into the seat.
- Aids
A swivel cushion can be placed on the passenger seat that allows the patient’s buttocks to swivel around as they enter or leave the seat. (A plastic bag laced on the seat is just as good, but it must be removed before driving off.)
A door catch adaptor can also be used to assist getting in and out of the car. The adaptor is about eight inches long in the shape of a small pick-axe, one prong being fitted to the door catch U bolt. This gives a good solid extra handgrip, being used as a lever to take a bit of the weight when letting go of the walking aid.
Reference Web: royalfree - precautions and physiotherapy following hip replacement.
Images Section: Author’s Left Hip X-Ray, Post Hip Replacement Aids, and Shower/Toilet Adaptations (Photos by Author)